Managing images, icons, and splash screens cross-platform is more challenging since we need to manage assert and resource folders specific to each platform, as well as image folders for each resolution.
During testing, we received feedback from our QA friends that the images were not working on this device or at this resolution. Hopefully, all of you have encountered this problem in the past, and MAUI application has released great solutions for this issue.
In your .NET MAUI application, managing your resources is much simpler than in Xamarin and other hybrid applications, as it is not as complicated. Resources refers to the main topic of managing images. With NET MAUI, you can stop worrying about scaling and resizing your images to fit every platform and screen resolution. Better yet, you won't need to keep track of the website that generates everything for you. .NET MAUI will take care of the process for you at build time; just add your images to your project and make sure the build actions are set up. The purpose of this article is to demonstrate how the MAUI application manages its resources.

The ultimate design goal of one single project for all supported platforms the way to manage resources from one place. Be it fonts, images, splash screen, or raw assets. It is an incredible feature that MAUI introduced using SVG files and PNG files and have them automatically resized for all the different resolutions when they are uploaded. Regardless if you've already used ResizetizerNT in your Xamarin project, MAUI will do the same internally while the build process is running in the background.
Resource files should be placed in the Resources folder of your. NET MAUI app project, or in child folders of the Resources folder, and their build action should be correctly set. The following sections will be explained one by one as we go along.
- Android resource naming rules is that image filenames must start with a letter character, end with a letter character, and contain only alphanumeric characters or underscores, so make sure your image name follows the same rules
- The .NET MAUI app converts SVG files to PNG files. When adding an SVG file, reference it from XAML or C# with a .png extension. You should reference the SVG file in your project file as a best practice.
- The values for the Foreground Color and Background Color can be specified either in hexadecimal or as a .NET MAUI color. For example, Color="Green" is valid.
MAUI Images
Images can be specified in one location in your app project, and at build time they are automatically resized and added to your app package. By doing this, you avoid manually duplicating and naming images per platform.
First Step, You can add images to your app project by dragging them into the Resources/Images folder of the app project which will allow you to add them to the project.
In the next step, you will be able to ensure that MauiImage build action is set automatically, if not set, you can ensure that the build action should be MAUIImage by selecting it from the Image Property.

MAUI Image Guideline
- The default MAUIImage tag, which includes all images, can be found in the.csproj file, and you can also specify the image name. The wildcard character (*) indicates that all files in the folder are considered to be of the specified resource type.
- You can also add images to other folders(not only Image folder). In this scenario, MauiImage must be manually set in the Properties window.
MAUI Image Property
- The base size is specified with the BaseSize="W,H" attribute, where W is the width of the icon and H is the height of the icon. The value specified as the base size must be divisible by 8. The following example sets the base size.
<MauiImage Include="Resources\Images\ msdevbuildlogo.jpg" BaseSize="376,678" />- It is also possible to stop the automatic resizing of the images. The following example code shows how to stop the automatic resizing
<MauiImage Include="Resources\Images\msdevbuildlogo.svg" Resize="false" />
- A foreground image can be tinted, i.e., by specifying a color with the TintColor attribute, a color will be applied to the foreground image. Here is an example of how the foreground image can be tinted using the following code:
<MauiImage Include="Resources\Images\msdevbuildlogo.svg" TintColor="#66B3FF" />
- The background image used in composing the app icon can be recolored using the Color attribute on the <MauiImage>. The following example sets the background color of the app icon to red
<MauiImage Include="Resources\Images\msdevbuildlogo.svg" Color="#512BD4" />
You can make use of your icon, image, and splash screen in the above property as specified above, so take note of that information.
MAUI Icon
In most apps, there is a logo icon that represents the app, and that icon appears in different places.
on iOS the app icon appears on the Home screen and throughout the system, such as in Settings, notifications, and search results, and in the App Store.
On Android, the app icon appears as a launcher icon and throughout the system, such as on the action bar, notifications, and in the Google Play Store.
On Windows, the app icon appears in the app list in the start menu, the taskbar, the app's tile, and in the Microsoft Store.
In a .NET Multi-platform App UI (.NET MAUI) app project, an app icon can be specified in a single location in your app project. At build time, this icon can be automatically resized to the correct resolution for the target platform and device, and added to your app package. This avoids having to manually duplicate and name the app icon on a per platform basisMAUI Icon Include & ForgroundFile
On the .csproj file, the app icon can be composed of two images, one image representing the background and another representing the foreground. <MauiIcon Include="Resources\AppIcon\appicon.svg" ForegroundFile="Resources\AppIcon\appiconf.svg" />- Include attribute represents the icon background image( must specify)
- Foreground attribute represents the foreground image (optional)

Platform specific configuration for MAUI App icon
The project file declares what resources make up the app icon, but you must update the individual platform configurations to reference these icon references. On iPhone, Mac, and Android, the following settings need to be made in the configuration, but Windows does not require any specific configuration
Info.PlistThis configuration will be automatically updated in Info.plist if you don't change app icon names, but if you change app icon names, make sure you update the configuration in Info.plist.
The Info.plist file contains a
<key>XSAppIconAssets</key> entry, with a corresponding
<string> node defined after it. The value of this
<string> node follows this format:
Assets.xcassets/{image file name}.appiconset The value for
{ image file name } is derived from the .NET MAUI project file's
<MauiIcon> item, specifically the file name defined by the Include attribute, without its path or extension.
 Android Manifest
The following Android configuration is defined by default, so all you need to do is migrate the application or make any modifications. Make sure the configuration is set correctly.

Use a different MAUI icon per platform
If you want to use different icon resources or settings per platform, add the Condition attribute to the <MauiIcon> item, and query for the specific platform. If the condition is met, the <MauiIcon> item is processed.
Only the first valid <MauiIcon> item is used by .NET MAUI, so all conditional items should be declared first, followed by a default <MauiIcon> item without a condition.
For example, a condition that targets Android would be Condition="$([MSBuild]::GetTargetPlatformIdentifier('$(TargetFramework)')) == 'android'".
The following XML demonstrates declaring a specific icon for Windows and a fallback icon for all other platforms:
<!-- App icon for Windows -->
<MauiIcon Condition="$([MSBuild]::GetTargetPlatformIdentifier('$(TargetFramework)')) == 'windows'"Include="Resources\AppIcon\MSDEVBUILDicon.png" ForegroundFile="Resources\AppIcon\appiconfg.svg" TintColor="#40FF00FF" />
<!-- App icon for IOS -->
<MauiIcon Condition="$([MSBuild]::GetTargetPlatformIdentifier('$(TargetFramework)')) == 'ios'"
Include="Resources\AppIcon\MSDEVBUILDicon.png" ForegroundFile="Resources\AppIcon\iosmsdevbuildappiconfg.svg" TintColor="#40FF00FF" /> <!-- App icon for Android -->
<MauiIcon Condition="$([MSBuild]::GetTargetPlatformIdentifier('$(TargetFramework)')) == 'android'"
Include="Resources\AppIcon\MSDEVBUILDicon.png" ForegroundFile="Resources\AppIcon\androidmsdevbuildappiconfg.svg" TintColor="#40FF00FF" />
<!-- App icon for mac -->
<MauiIcon Condition="$([MSBuild]::GetTargetPlatformIdentifier('$(TargetFramework)')) == 'maccatalyst'"
Include="Resources\AppIcon\MSDEVBUILDicon.png" ForegroundFile="Resources\AppIcon\macmsdevbuildappiconfg.svg" TintColor="#40FF00FF" /> <!-- App icon for all other platforms -->
<MauiIcon Include="Resources\AppIcon\Suthaharappicon.png" ForegroundFile="Resources\AppIcon\appiconfg.svg" TintColor="Yellow" />
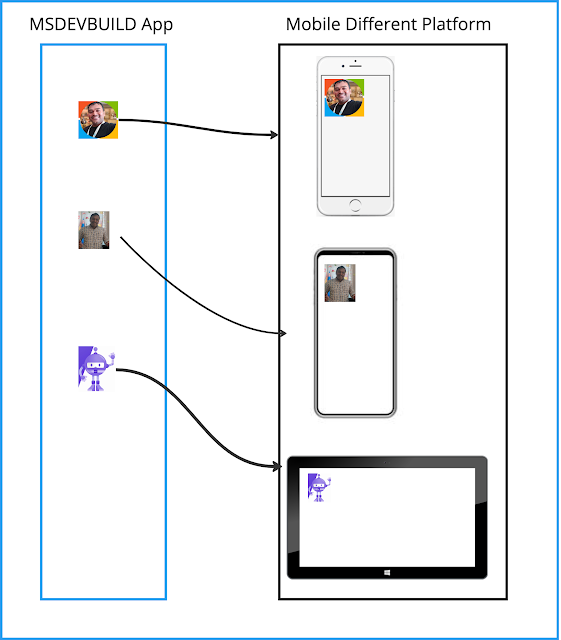
MAUI Icon Guideline
- In your project file, the <MauiIcon> item designates the icon to use for your app. You may only have one icon defined for your app. Any subsequent <MauiIcon> items are ignored.
- After changing the icon file, you may need to clean the project in Visual Studio. To clean the project, right-click on the project file in the Solution Explorer pane, and select Clean. You also may need to uninstall the app from the target platform you're testing with.
- If you don't clean the project and uninstall the app from the target platform, you may not see your new icon.
MAUI Splash Screen
On Android and iOS, .NET Multi-platform App UI (.NET MAUI) apps can display a splash screen while their initialization process completes. The splash screen is displayed immediately when an app is launched, providing immediate feedback to users while app resources are initialized:
In a .NET MAUI app project, a splash screen can be specified in a single location in your app project, and at build time it can be automatically resized to the correct resolution for the target platform and device and added to your app package. This avoids having to manually duplicate and name the splash screen on a per platform basis.
A splash screen can be added to your app project by dragging an image into the Resources\Splash folder of the project, where its build action will automatically be set to MauiSplashScreen. This creates a corresponding entry in your project file as like below screen
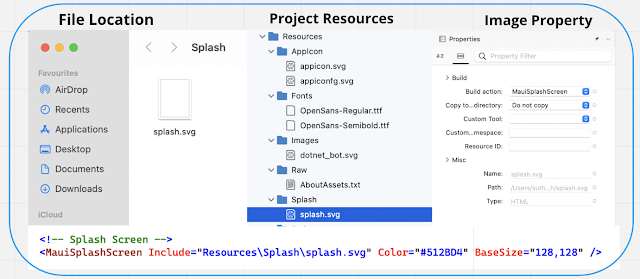
At build time, the splash screen can be resized to the correct resolution for the target platform and device. The resulting splash screen is then added to your app package.
Platform specific configuration
The code that's specific to a platform automatically gets added to the code base, but you have to know where it goes and why, it'll help you with the migration process
On Android
the splash screen is added to your app package as Resourcs/values/maui_colors.xml and Resources/drawable/maui_splash_image.xml.
.NET MAUI apps use the Maui.SplashTheme by default, which ensures that a splash screen will be displayed if present. Therefore, you should not specify a different theme in your manifest file or in your MainActivity class
using Android.App;
using Android.Content.PM;
using Android.OS;
namespace NewProjectFile7._0;
[Activity(Theme = "@style/Maui.SplashTheme", MainLauncher = true, ConfigurationChanges = ConfigChanges.ScreenSize | ConfigChanges.Orientation | ConfigChanges.UiMode | ConfigChanges.ScreenLayout | ConfigChanges.SmallestScreenSize | ConfigChanges.Density)]
public class MainActivity : MauiAppCompatActivity
{
}
On iOS
It is not necessary for you to do iOS-specific settings because the build will automatically take care of this for you. the splash screen is added to the app package as a storyboard named MauiSplash.storyboard, which is set as value of the UILaunchStoryboardName key in the app package's Info.plist automatically add UILaunchStoryboardName as a key and string value is MauiSplash
Summary
If you have any further questions regarding MAUI app icon, MAUI splash screen, or MAUI image, please don't hesitate to let me know in the comment section. I hope that this article can help you to understand MAUI app icon, MAUI splash screen, and MAUI image to different mobile platforms. . In case you missed my previous article, you can refer to the links below.
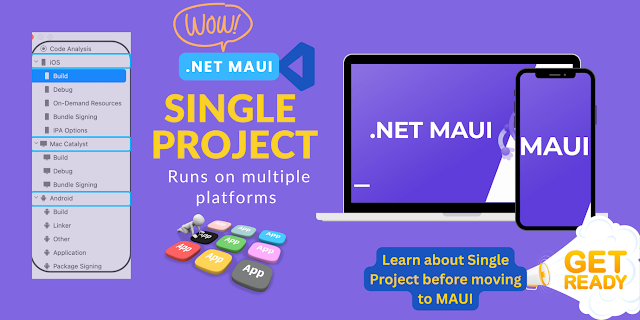
The name MAUI stands for .NET Multi-platform App UI. Many IT companies struggle with deciding whether to migrate from XAMARIN or to start from scratch with a new hybrid application. You should not make any mistakes, better choose to move to MAUI. Prior to migration, you must understand what the main project file and platform specific changes are that differ from XAMARIN. It is not the purpose of this article to explain migration, but you should know before you migrate what the main changes have been to the project files in MAUI. To gain a deeper understanding of MAUI project files, let's follow me one by one in this article
 Prerequisites
Visual Studio 2022 with the MAUI workload installed
Xamarin, MAUI Support for Visual Studio MacAs we all know, Microsoft supports MAUI from Visual Studio 2022 latest version in Macs and Windows. Several people asked me if I could install Visual 2022 from my Mac, and if so, could it keep creating/modify Xamarin Forms, and the answer is yes, which means Microsoft continues to support Xamarin for now, so the latest Visual studio 2022 has both Xamairn and MAUI project templates, so if you are starting a new project, choose MAUI as the template, because it has wonderful features.
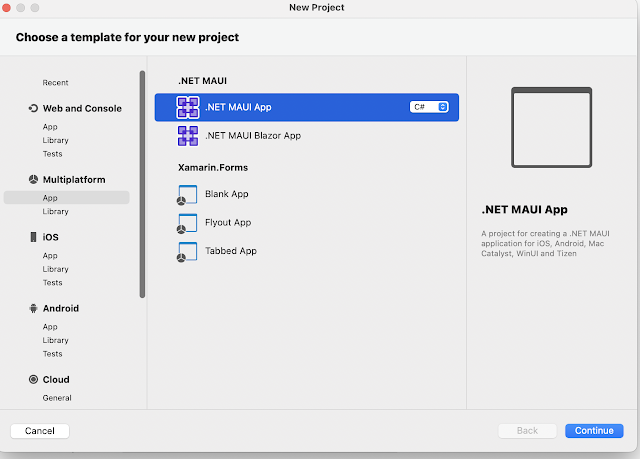 MAUI Project File
A user can build a .NET MAUI application for Android, iOS, macOS, and Windows in one project file. Xamarin Forms uses different project files for Individual platforms. the .NET MAUI application is focused on Android, iOS, macOS, and Windows, simplifying and standardizing the cross-platform development experience for all four platforms.
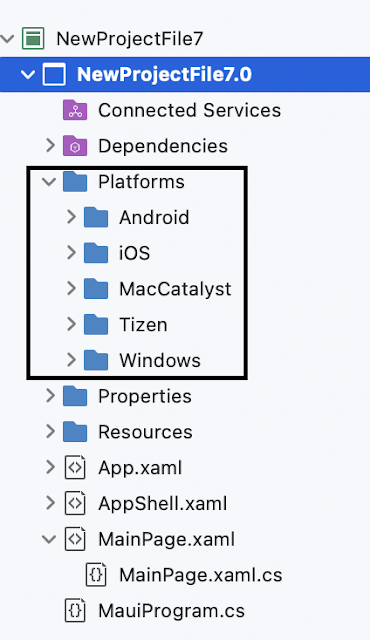 MAUI SDK-style format
The .NET SDK is the base SDK for .NET. Projects associated with the other SDKs have access to all the .NET SDK properties. The default .Net Framework project is not SDK style and the default .Net Core, MAUI and .Net Standard project will be SDK style by default, Right click on your project and see the project file Below is the code for the MAUI project file, which is an XML file. The Sdk attribute defines which SDK is targeted.

All project-level properties are enclosed within the PropertyGroup node. ItemGroup node holds dependencies, such as Project(s) referenced, NuGet package(s) added, Resource definitions, etc, will check line by line here
Multiple Target PlatformMAUI is multi-targeting by design, hence the TargetFrameworks list (which is separated by a semicolon).The Target Framework Monikers are all prefixed with net7.0-.The reason for this is that there is only one BCL.The actual platform is then specified (iOS, Android, MacCatalyst, and Windows).
 Use MAUI & Output Type
OutPutType : This MAUI project will produce an executable (an App) on each of the platforms as the output type.
UseMAUI: UseWPF introduced in .NET Core 3 is familiar to developers with WinForms/WPF backgrounds.Whether or not to include references to MAUI libraries is controlled by the UseMAUI property.The MSBuild pipeline is also altered to correctly process a MAUI project and related files. Instead of referencing NuGet packages, set the UseMAUI property to true to add MAUI packages
 SingleProject
The SingleProject tag represents .NET MAUI's main design goal, multi-targeting.
 RootNamespace
RootNamespace, the root namespace for the types contained within this project.(My Project name - NewProjectFile7._0)
 ImplicitUsings
.NET 6 introduces implicit namespace support for C# projects. To reduce the amount of using directives boilerplate in .NET C# project templates, namespaces are implicitly included by utilizing the global using feature introduced in C# 10. When you create a new .NET 6 and above project it will enable this new property
 Mobile App Shared Configuration (App manifest)
Since we only have one project, we don't have to manage different platform configurations. We are able to configure in one project and we are not required to manage different platform configurations.
 MAUI Image
 MAUI Image is a newly introduced node, which helps in including SVG images and is based on the popular resize component, which resizes the images internally based on the platform.Provides developers with a much easier process for including images across multiple platforms.
In a .NET Multi-platform App UI (.NET MAUI) app project, images can be specified in a single location in your app project, and at build time they can be automatically resized to the correct resolution for the target platform and device, and added to your app package. This avoids having to manually duplicate and name images on a per platform basis. By default, bitmap (non-vector) image formats, including animated GIFs, are not automatically resized by .NET MAUI.
.NET MAUI images can use any of the standard platform image formats, including Scalable Vector Graphics (SVG) files
 MAUI Icon
An app icon can be specified in a single location in your .NET Multi-platform App UI (.NET MAUI) project. Your app package can automatically resize this icon to the appropriate resolution for the target platform and device at build time.
By doing this, it will be possible to avoid having to duplicate and name app icons on a platform-by-platform basis. .NET MAUI does not automatically resize bitmap (non-vector) image formats.
 Maui Splash Screen
At build time, a splash screen can be automatically resized to the correct resolution for the target platform and device, and added to the app package for a .NET MAUI app project. This eliminates having to duplicate and name splash screens on a platform-by-platform basis.
 SVG Image convert to PNG
SVG files are converted to PNG files by NET MAUI. When adding an SVG file to your .NET MAUI app project, it should be referenced from XAML or C# with a .png extension. SVG files should only be referenced in project files.
MAUI Mobile Target Version
I'll explain this part of the configuration UI screen, select your Root project from solutions and click the Properties afterward.
The Target platform shows all the basic details of a mobile app platform, such as Target .Net Run time, Target mobile OS version, and the Min mobile OS version. You can choose your app's Min and Max target mobile OS version.

MAUI Shared Application SettingOn the below screen, you will see that .NET MAUI project settings are shared among all target mobile platforms.
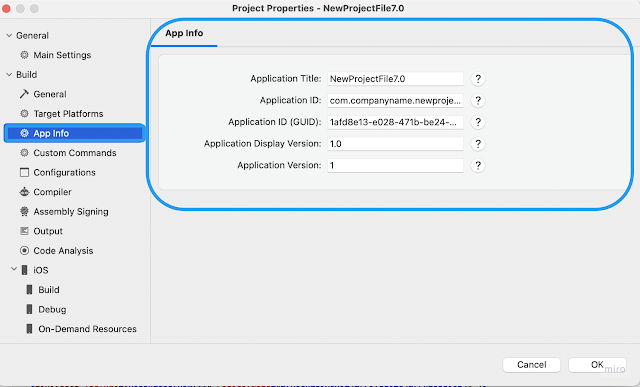
- Application Title - It is the name that appears as the Title in installed apps.
- Application ID - the unique identifier of the application in reverse domain name format, for example com.msdevbuild.maui.
- Application ID (GUID) - The identifier of the application in GUID format.
- Application Display Version - The version of the application. This should be a single digit integer. Defaults to 1.
Platform Specific ConfigurationYou can add all your platform specific configurations for iOS, Android, Windows and Mac by selecting the section. This was previously done in a platform-specific project in an target project, but now it can be done in a shared project configuration.
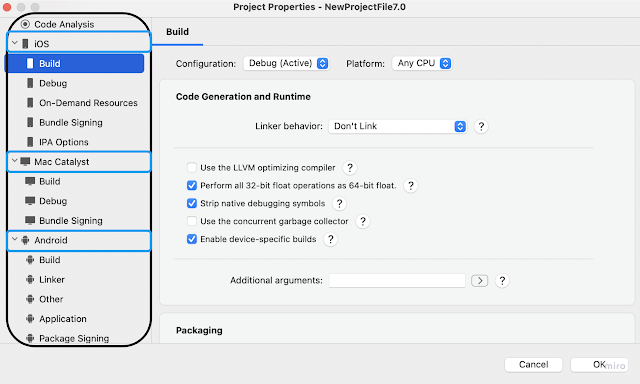 Platform-specific code
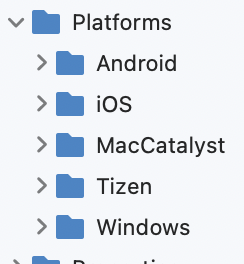
A .NET MAUI app project contains a Platforms folder, with each child folder representing a platform that .NET MAUI can target, The folders for each platform contain platform-specific resources, and code that starts the app on each platform and there are platform-specific configuration files for every platform, like the App manifest, info.plist, and other configuration files.
 Summary
I hope that this article helps you to understand how you can create one project for multiple platforms. In case you missed my previous article, you can refer to the links below.
.NET MAUI provides different techniques for local storage, in my
previous article, explain preferences. This article will explain how to use secure storage in your mobile iOS, Android, and windows applications.
Secure storage is like a shared preference. It stores data in key and value pairs. The data is encrypted and users a key made from a unique device key to encrypt and decrypt the data stored. The data is stored in a secure storage directory where only the OS can access it.

You must keep in mind Do and Don’t Do things about Secure Storage.
- There are no storage limitations for secure storage, best practices, and performance, secure storage may be impacted if you store large amounts of text, as the API was designed to store small amounts of text.
- You can store an unlimited number of keys inside
- The data gets deleted once the app is uninstalled.
- Best practice, you can choose to disable Auto Backup for your entire application, or You can create a custom rule set to exclude Secure Store items from being backed up.
Don’t Do in Secure Storage
- Secure storage to store data that should be encrypted and hidden from the user. That data should store only store users' sensitive data such as their API keys and not your server private keys and server connection string. Although data stored in secure storage are encrypted, it isn't entirely secure. Users can root/jailbreak their devices which gives them full control of the OS. There are tools that can intercept keys as they are provided and use them to decrypt the data. The only way to prevent that is to never save the server details and non-user-related data to the user device. You should store it on a server that you can control.
- When you try to save the max length string into the Preferences and secure storage to your device, it throws a Memory Exception when Preferences and secure storage data exceed 1.42 MB so don’t try to save a large amount of text, so if you have more than 1.42 MB data size to save it’s better to save use File storage or SQLite database.
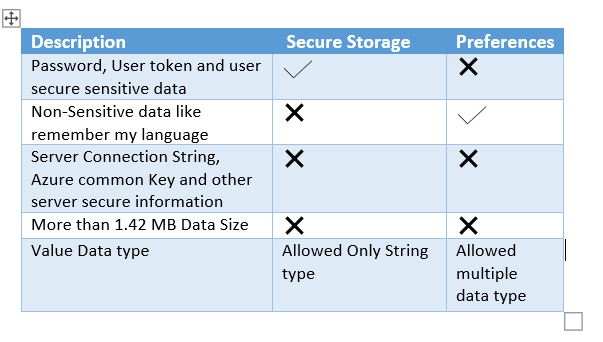
Secure Storage VS. preferences
You probably already know about
preferences, which is very useful when you want to save non-private information, but where you need to use secure storage, the following key difference will help you to understand.
Getting started with MAUI Secure Storage
The following steps are to create/get / Clear secure storage using.Net MAUI application. The .Net MAUI Secure Storage and ISecureStorage types are available in Microsoft.Maui.Storage namespace.
Secure storage will work on all the platforms iOS, macOS, Android, and windows, Only iOS simulator debugging require extra setup will explain in the last section.Create New project
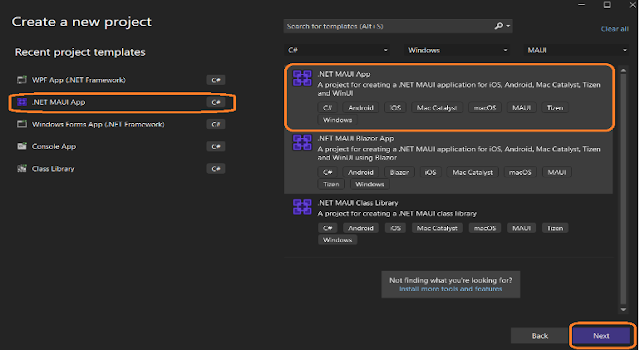
You can open visual studio 2022 from your Windows / Mac machine. You must follow the below 3 steps to create a new MAUI application.
Step 1: Select Create a new project
Step 2: Search the MAUI project template or choose Project Type > MAUI from the drop-down.
Step 3: Provide the configuration Details as a project name, Location, and Solutions name.

Namespace
Secure storage is storing data in key-value pairs and can be easily managed via the secure storage class from Microsoft.Maui.Storage namespace, so accesses secure storage add the Microsoft.MAUI. storage namespace
Save Secure Storage
SetAsync method, providing the key and value. it supports strings only. If you want to store other types of data, you can encode them as a string. The most convenient way to do that is probably JSON. You can use JSON serialize and deserialize.
await SecureStorage.SetAsync("Key String ", "Value String ");
For Example, while using implementation you can use like below
await SecureStorage.SetAsync("UserPassword", "MSdevBuild@123");
The Mobile Secure storage will work as per the platform-specific; the below section will show how different platforms store the secure storage in the device.
Android Device Secure Storage
Secure Storage uses the preference API and follows the same data persistence with a filename
[YOUR APP Package name ID].microsoft.maui.essential.preferences
However, data is encrypted with the Android EncryptedSharedPreference Class, and the secure storage value is encrypted with AES-256 GCM.
iOS Device Secure Storage
Key Chain is used to store values securely on iOS devices. The SecRecord used to store the value has a Service value set to
[YOUR-APP-BUNDLE-ID].microsoft.maui.essentials.preferences.
Windows Device Secure Storage
DataProtectionProvider is used to encrypt values securely on Windows devices.Encrypted values are stored in ApplicationData.Current.LocalSettings, inside a container with a name of
[YOUR-APP-ID].microsoft.maui.essentials.preferences.
Read Secure Storage
In the above code snippets, you understood the saved the secure storage string value, in the below statement will get the value from existing secure storage.
await SecureStorage.GetAsync("Existing save Key");
Here you don’t have the option to check the key already available or not, but you can check values there or not using strining.IsnullorEmpty.
string securepassword = await SecureStorage.GetAsync("UserPassword");
if(!string.IsNullOrEmpty(securepassword))
{
//Statement
}
Remove Secure Storage
Remove and Remove all will use for dropping the Secure Storage key and value, suppose if you are doing any logout or switching to a different user this will help to clear all the Secure storage from your device.
Remove will give the confirmation with the bool return type, this will help us for navigation after confirmation.
bool isremoved = SecureStorage.Remove("UserPassword");
Suppose, User tries to log out or switch to different users, the best way to use remove all secure storage
SecureStorage.RemoveAll();IOS Specific Secure Storage Setup
You must follow the below steps for only IOS simulator
Secure Storage Setup for IOS Simulator
I have received this question from many of them, “I want to use Secure Storage on iOS and Android mobile phones and tablets, but I get this error message on iOS simulator but it works well in Android emulator, devices and IOS devices”

The above issue is common for Xamarin and MAUI, you can follow the below steps will work in IOS simulator.
When developing on the iOS simulator, enable the Keychain entitlement and add a keychain access group for the application's bundle identifier.
Step 1: Create or open the
Entitlements.plist in the project and This will automatically add the application's identifier as a group
Step 2: In the project properties, under iOS Bundle Signing set the Custom Entitlements to Entitlements.plist.

Export compliance documentation for encryption, while Uploading AppStore
Complying with Encryption Export
Regulations screen when uploading to the apple store, suppose you app makes calls to a web service via HTTPS and MAUI Xamarin Secure Storage to store secure information, in this case, you don’t worry about Encryption export Regulation, as per Apple documentation No documentation required.

If you do the below steps, next time you won’t get the above Dialog wizard.
Add the ITSAppUsesNonExemptEncryption key to your app’s Info.plist file with a Boolean value that indicates whether your app uses encryption. Set the value to NO if your app using only Secure Storage and https API call, next

Summary
The Secure Storage class is intended to store small pieces of secure storage information. If you need to locally save and retrieve more complex and structured data, a good option is to use a local database.
.NET MAUI provides 4 techniques for local storage options for storing data in locally on a device, depending on the nature, structure, and size of the data. The most used following 4 ways to store the local data on mobile devices.
- Preferences
- Local File Storage
- Local Database
- Secure Storage.
In this article, will share about the .Net MAUI Preference storage technique. Preferences is stores data in key-value pairs and can be easily managed via the Preferences class from Microsoft.Maui.Storage namespace and if you do Uninstall the app will also remove all local preferences, but if you are close and open the application still local preference can able to retrieve the old data.

The Preferences class stores preferences in the native local storage, more specifically
- For Android, in the SharedPreferences.
- For iOS, in the NSUserDefaults.
- For UWP, in the ApplicationDataContainer.
On each platform, preferences are key/value pairs. The value can be of one of the primitive .NET types. Before understanding how preferences work, it is important to list the methods exposed by the Preferences class
Create a new MAUI Application
You can open visual studio 2022 from your Windows or Mac machine. You must follow the below 3 steps to create a new MAUI application
Step 1: Select Create a new project
Step 2: Search the MAUI project template or choose Project Type > MAUI from the drop-down.
Step 3: Provide the configuration Details as a project name, Location, and Solutions name.
Save Preferences
Save/ Set Preference will store simple value, preference having different key and value, preference key always string type, the value of preference must be one of the following types
- Boolean
- Double
- Int32
- Single
- Int64
- String
- DateTime
Preferences are set by calling the Preferences. Set method, providing the key and value
Preferences.Set(“KEY”,” Value”).
Get/ Default Preferences
In this example already saved the two-preference value, in the below statement will the get the value from existing preference or if preference value is not there automatic or return the default value.
Preferences.Get("Existing preferences key", Default Value);
The following code confirmed already saved preference key is available or not
Clear Preferences
Clear and remove will use for dropping the preference key and value, suppose if you are doing any log out or switching to a different user this will help to clear all the preference key and value.
Preferences.Clear();
Suppose if you want to remove a particular key preference in the mobile, you can use remove preference as like below
Preferences.Remove(“Name”);
Summary
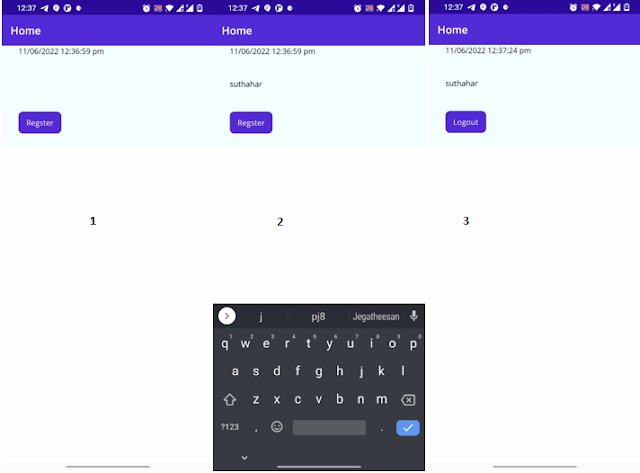
The Preferences class is intended to store small pieces of information represented by primitive .NET types. If you need to locally save and retrieve more complex and structured data, a good option is to use a local database like SQL lite and you can refer below screen output for the preference sample application.
Screen 1: Show the first screen and display the default Date Time preference value in the label
Screen 2: After clicking on Register store the user name and the latest time in the preference
Screen 3: Display the existing preference value, if the user clicks on the logout option, the preference value becomes clear.
This article provides an understanding of VerticalStacklayout and HorzontalStackLayout using .NET Multi-platform APP UI (MAUI), which is a cross-platform framework for creating native mobile and desktop apps with C# and XAML
A StackLayout organizes child views in a vertically oriented or horizontally one-dimensional stack, but the Microsoft team introduced VerticalStacklayout and HorzontalStackLayout same as stack layout with improved a lot more performance and avoided unnecessary layout calculations being performed. this article will show a quick demo of VerticalStacklayout and HorzontalStackLayout.

Environment Setup
I have shared a details explanation of the MAUI Development environment setup and getting started with the first MAUI application in my previous
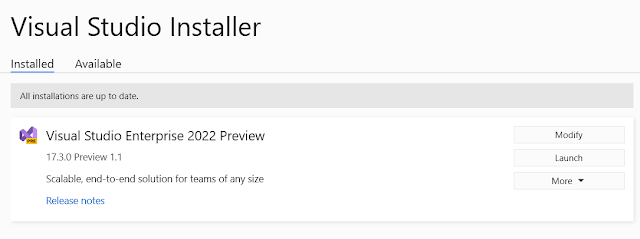
article. Microsoft MAUI team continuously releases changes, so make sure you have updated the latest visual studio 2022 preview version.
Create a new MAUI Application
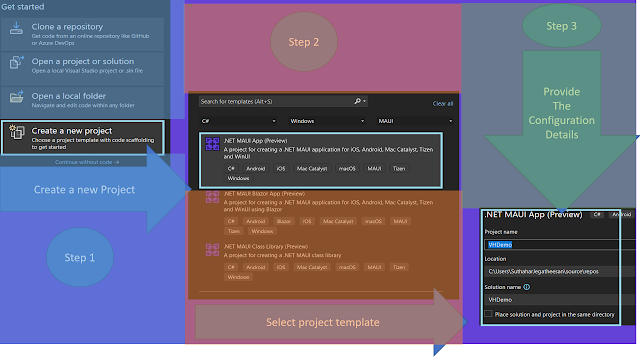
You can open visual studio 2022 from your windows machine. You must follow the below 3 steps to create a new MAUI application
Step 1: Select Create a new project
Step 2: Search the MAUI project template or choose Project Type > MAUI from the dropdown.
Step 3: Provide the configuration Details as a project name, Location, and Solutions name.
The generated templates contain one project with Android, IOS, Windows, Mac and Tizen.

HorizontalStackLayout
The Xamarin forms already have StackLayout organizes child views in a one-dimensional stack, either horizontally or vertically. The HorizontalStackLayout organizes child views in a one-dimensional horizontal stack and is a more performant alternative to a StackLayout.
In this example, we have a design registration screen with 3 important sections label control, an entry box, and an error label.
Add the HorizontalStacklayout instead of Stacklayout with orientation.
Many of them asked questions like, How to align a label and entry box horizontally same line label at the start and Entry at the end? You could set VerticalOptions of that two control to Start/Centre, then the control would align horizontally .
Label, Entry, and Error label add same as Xamarin Forms Design
Once you did the design, the output looks like below

VerticalStacklayout
The VerticalStackLayout organizes child views in a one-dimensional vertical stack and is a more performant alternative to a StackLayout with a vertical. Position and size of views is based on the HeightRequest, WidthRequest, HorizontalOptions and Vertical Options. The following example we used VerticalStackLayout for designs the screen. VerticalStackLayout used for displaying your control one by one.
The LayoutOptions is set via the HorizontalOptions or VerticalOptions properties on any View. They can be set to any of the following options: Start, Center, End, Fill, StartAndExpand, CenterAndExpand, EndAndExpand, FillAndExpand and you can add the following code as per below
The layout looks like the below with 3 controls

Nested VerticalStackLayout/HorizontalStackLayout
A VerticalStackLayou and HorizontalStackLayout can be used as a parent layout that contains nested child of both objects, and other child layouts.
You can see the below example XAML for nested layout, the more the nested layouts will impact your performance., if you are trying to add multiple levels, you can try choosing the correct layout control.
In this example, the parent VerticalStackLayout contains nested HorizontalStackLayout objects and adds the control set.

Summary
In this article, you have seen the demo .NET MAUI VerticalStackLayout and HorizontalStackLayout Layout and how different from stack layout using Visual Studio 2022, Thanks for reading, will share more Dotnet MAUI related articles in the upcoming days.
.Net MAUI is a cross-platform framework for creating native mobile and desktop apps with c# and XAML. You can refer to my
previous article for getting started with the Dotnet MAUI application. Building iOS application in Windows machine Using Visual Studio 2022, Will do following two approaches for debugging and build the iOS application.
- Remote Host (Required Mac)
- Xamarin Hot Restart (Without Mac)
In this article, I will show Pair to Mac M1 Chip from windows machine for MAUI iOS app using Visual Studio 2022 preview. I am going to show a POC app with Visual Studio2022 preview, you can also use the same steps in Visual Studio 2019 or 2022++ version.
Mac M1 Chip Setup
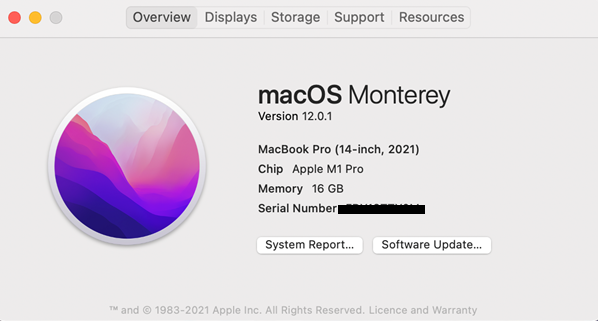
Mac Setup is ready here with the following configuration, Upgraded macOS Monterey 12.0.1 version in the Apple M1 Pro Macbook.
The Mac system installed
Xcode 13.3 ++ and
Visual Studio for mac. You have to open Xcode manually after installing so that it can add any additional components.
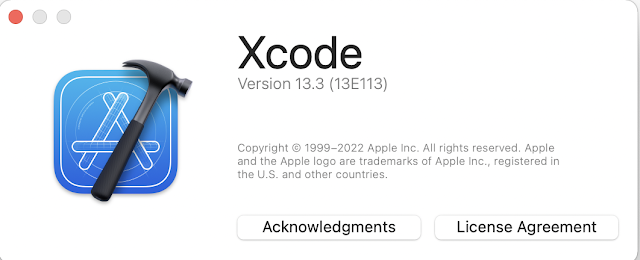


You must follow the below steps to enable Remote Host.
- Select the “System preferences “
- Click on the Sharing pane.


You must configure remote login and follow the below configuration
- Remote login Set as “ON”
- Configured to allow access for all users.
- If prompted, configure the macOS firewall.
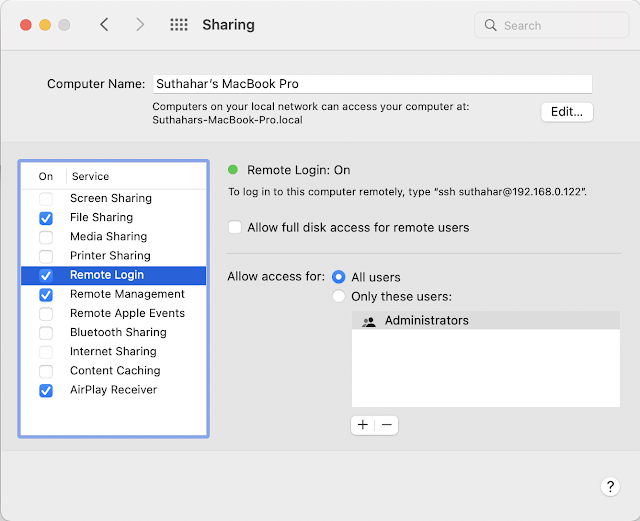
You must connect your Mac with the same Wi-Fi network or wired network.

You can click on the Computer icon to connect mac machine or select Tools > iOS > Pair to Mac.

If it is on the same network as the windows machine, the Mac should now be discoverable by Visual studio, if the Mac is still not discoverable, try manually adding a Mac.
Provide Mac name or Mac IP address which is in the remote Login preference on the Macbook.
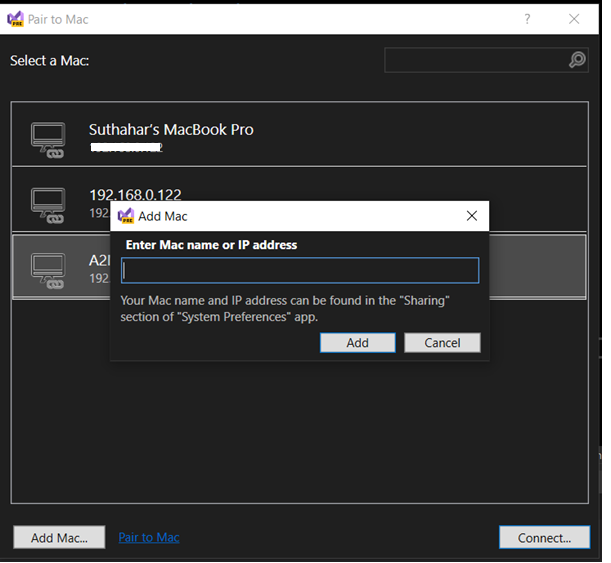
At the prompt, enter your username and password for that machine after the IP address is entered in the above screen.
Pair to Mac uses these credentials to create a new SSH connection to the Mac, Remote Host will take care of automatically checking the connection and verifying the Mac machine setup, if any mismatch you will get the error popup and ask you resolve and retry.
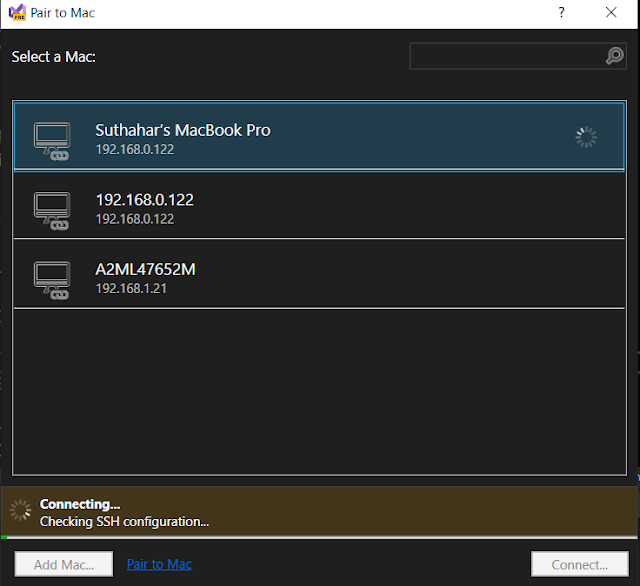
When Visual Studio is connected to a Mac, that Mac's item in the Pair to Mac dialog displays an icon indicating that it is currently connected
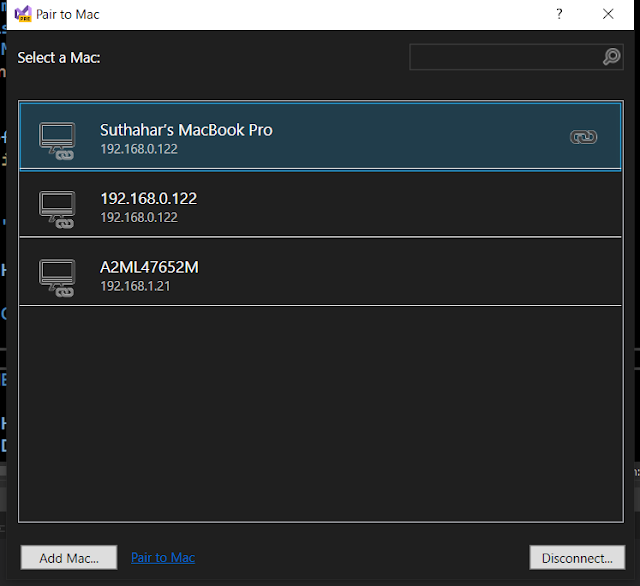
You will be able to see the below screen automatically. All iOS simulators are loaded after the mac connected successfully and also able to see the computer icon indicated with a green icon.

If you have any issue verify in iOS setting a windows machine, On Visual Studio > Tools > options > Select the iOS setting.
- Verify the XCode path, make sure Xcode installed in the application folder from Mac machine
- Remote Simulation should be on, otherwise, Simulator won’t be displayed on windows machine
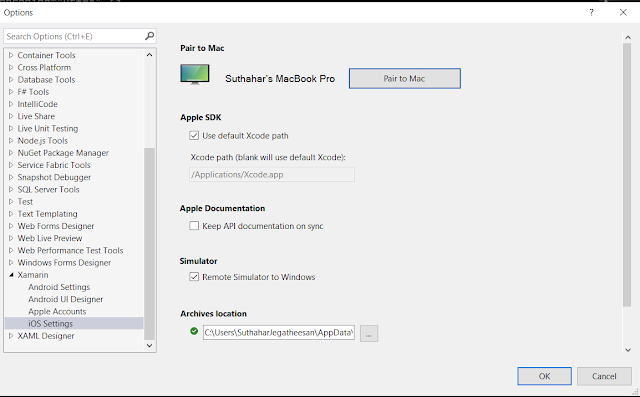
Remote iOS Simulator shows up as a black screen
Completely unable to use the iOS Simulator for Windows 10, only happening when using an M1-based Mac. When using an Intel-based Mac, we can successfully use the iOS simulator.
A fix for this issue has been Microsoft implemented and is being prepared for release. Microsoft will update to all once it becomes available for download.
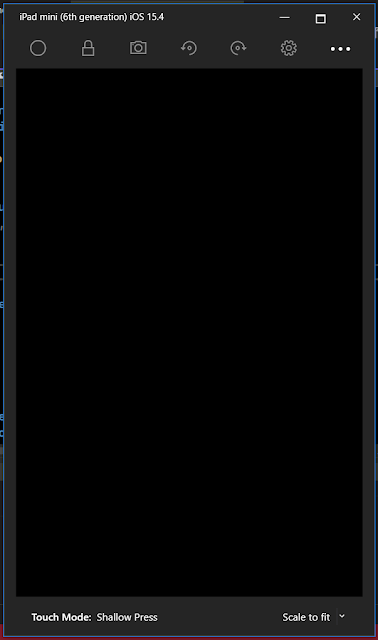
There is a workaround to force the simulator to load on the Mac M1, which works, but is certainly not a great solution and isn’t viable for many.
You can go to Tools->Options->Xamarin->iOS Settings and uncheck ‘Remote Simulator to Windows’.
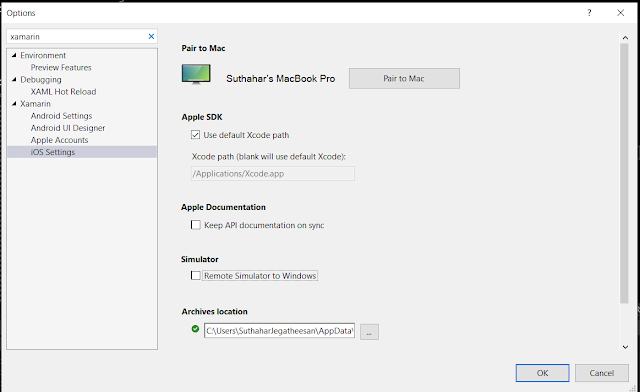
The MAUI application is ready to show on the iOS simulator from Mac M1 chip.
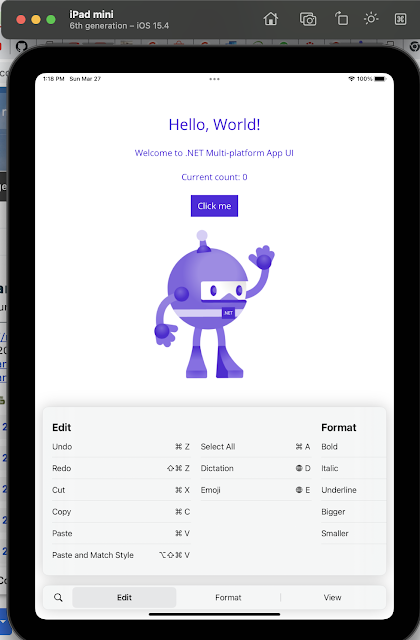
Summary
This article showed steps how to use Pair to Mac M1 chip to connect Visual Studio 2022 preview to a Mac build host, enabling Visual Studio 2022 preview developers to build iOS applications with MAUI


