Customize the Bot conversation message with power virtual agent
Power Virtual Agents are an easily created powerful bot and no-code graphical interface without the need for data scientists or developers. It eliminates the gap between the subject matter experts and the development teams building the bots and it minimizes the IT effort required to deploy and maintain a custom conversational solution. In my previous article you learned how to set up and quick overview about power virtual agents.
In this article you will learn more about how you can customize the bot conversation messages. User conversation message called as “Topic” in Power virtual agents. A topic has trigger phrases - these are phrases, keywords, or questions that a user is likely to type that is related to a specific issue - and conversation nodes - these are what you use to define how a bot should respond and what it should do and you can maintain up to 1000 topics in a Bot.

When youhave successfully create bot applications, you are able to see a number of topics will be created automatically and also you can see how the bot conversation works in practice by testing it in the Test bot pane. For example, a user might type “I want a Business Laptop" into your bot. The AI will recommend the Business Laptop and request you to confirm adding to the cart. Bot will suggest you provide “Yes” or “No”.

There are two topics the category system will generate. You can refer and learn the topic, how you need to implement it for your business use case.
User Topics Category you will find Four pre-populated User Topics that are titled as lessons. These lesson topics can be used to help understand, simple to complex ways of using nodes to create bot conversations.
System Topicsis reusable topics like greeting, Say goodbye like that. These are pre-populated topics that you are likely to need during a bot conversation.
In this article you will learn more about how you can customize the bot conversation messages. User conversation message called as “Topic” in Power virtual agents. A topic has trigger phrases - these are phrases, keywords, or questions that a user is likely to type that is related to a specific issue - and conversation nodes - these are what you use to define how a bot should respond and what it should do and you can maintain up to 1000 topics in a Bot.
User and System Topic
Once again remind you, before reading this article, You can follow my previous article to learn more about setup and create the first Power Virtual agent Bot application.When you
There are two topics the category system will generate. You can refer and learn the topic, how you need to implement it for your business use case.
User Topics Category you will find Four pre-populated User Topics that are titled as lessons. These lesson topics can be used to help understand, simple to complex ways of using nodes to create bot conversations.
System Topics
Create New Topic
You can create your own topic and maintain up to 1000 topics in a Bot.
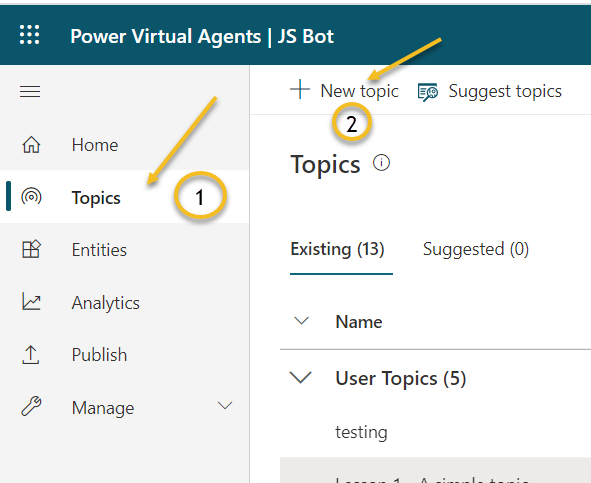
Step 1: Go to the Topics tab on the side navigation pane to open thetopics page.
Step 2: on the Topic page, Select the New Topic option on the top navigation pane.

Step 3: Provide a topic name, description, and one or more trigger phrases for the topic by clicking on Add button.

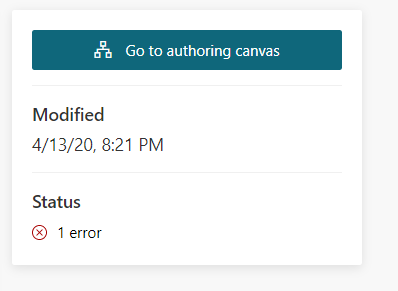
Click on Save Topic options on the right corner on the Topics page. Once click on Save topic, you will get the error and asking you to set Authoring Canvas

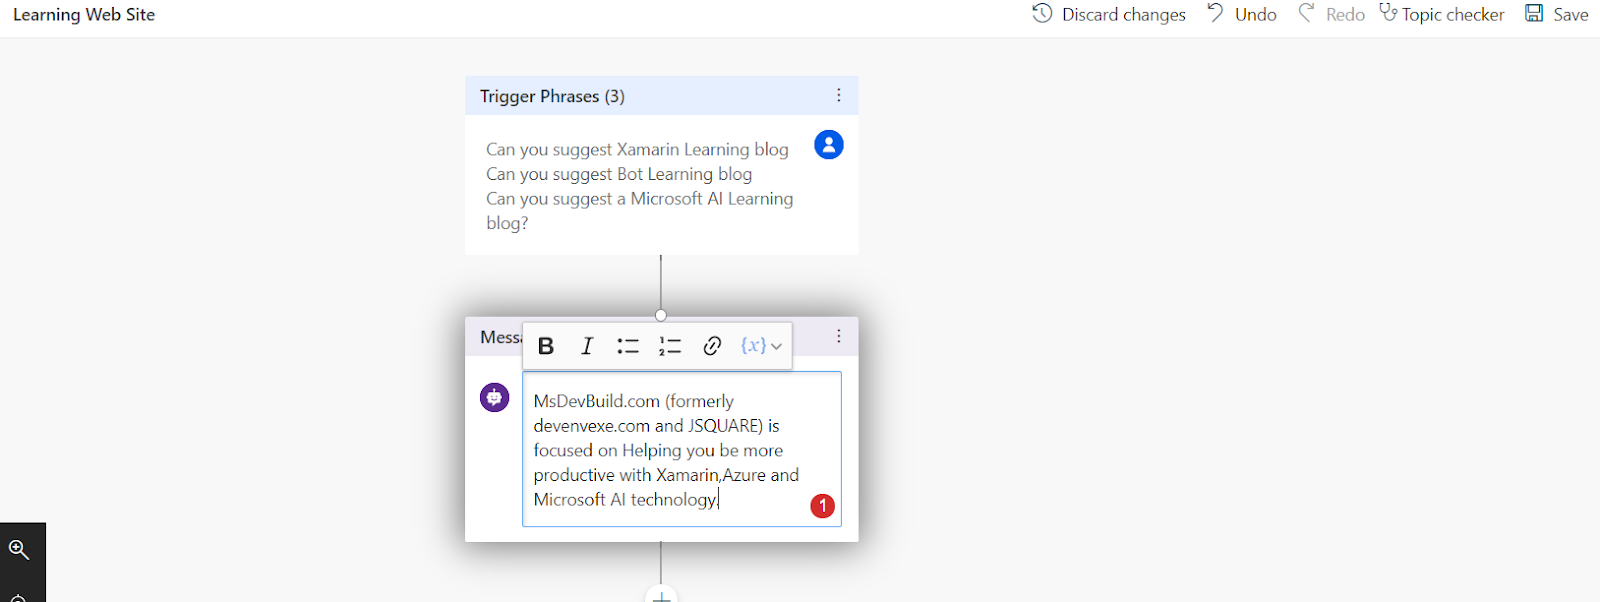
Power Virtual Agents open the topic in the authoring canvas and displays the topic's trigger phrases. The authoring canvas is where you define the conversation path between a customer and the bot, message Edit text box having styling feature, add and change the text font style and hyperlink

Build and Save Topic
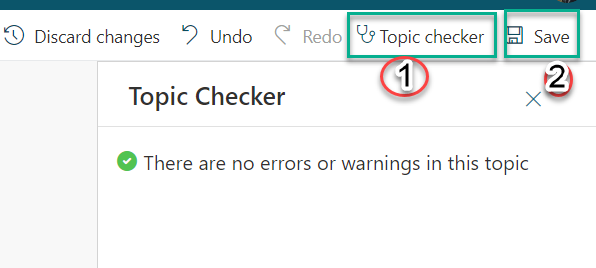
Once you havedone the changes, Click on Topic Checker. Topic checker will show you if there are any errors or warnings in the topic. If there's no error, Click on Save options.


You have successfully created topics and run the application in the power virtual agent. I hope you have enjoyed learning about the Power virtual agent bot. If you have any questions/feedback/issues, please write them in the comment box.
Step 1: Go to the Topics tab on the side navigation pane to open the
Step 2: on the Topic page, Select the New Topic option on the top navigation pane.
Step 3: Provide a topic name, description, and one or more trigger phrases for the topic by clicking on Add button.
Go to
Click on Save Topic options on the right corner on the Topics page. Once click on Save topic, you will get the error and asking you to set Authoring Canvas Power Virtual Agents open the topic in the authoring canvas and displays the topic's trigger phrases. The authoring canvas is where you define the conversation path between a customer and the bot, message Edit text box having styling feature, add and change the text font style and hyperlink
Build and Save Topic
Once you have


0 Comments